First Steps with VBA: Discover the VBA Editor

Reading time: 3 minutes

VBA is the programming language inside Excel. With it, you can automate everything you do by hand: sorting, copying, formatting, creating reports.

Whether you write your code yourself or ask an AI to write it for you, there is one prerequisite: you must know the interface of VBA, the Visual Basic Editor. That’s where you paste, run, and correct your code. Here is a simple tour.

1. Open the VBA editor

Press Alt + F11. The VBA editor opens in a new window. Press Alt + F11 again to go back to Excel.

You can also open it from the Developer tab by clicking the Visual Basic button in the first position from the left. If you don’t see this tab, see Enable the Developer Tab in Excel.

The Visual Basic button in the Developer tab of Excel

2. The working environment

The editor has several windows. These are the four you will use the most:

  1. Project Explorer: all the open workbooks, their sheets and their modules (Ctrl + R)
  2. Code window: the white window where you write your code (F7)
  3. Properties window: the properties of the selected item, for example, the name of a module (F4)
  4. Immediate window: a small window to test a line of code or display a result (Ctrl + G)
The VBA editor and its 4 windows: Project Explorer, Code, Properties and Immediate

If a window disappears, you can always reopen it from the View menu or with the shortcuts.

3. Where to write your code

In the Project Explorer, each workbook is a VBA project. To write a macro, you need a module: a page of code. In the menu, choose Insert › Module. A new item Module1 appears in the project, and its code window opens.

You will also see other places where you can write code:

  • Modules (Module1, Module2…): this is where you write your macros. It’s the right place in 9 cases out of 10.
  • The sheets (Sheet1, Sheet2…) and ThisWorkbook: they are used for code that starts automatically, for example when you open the workbook or change a cell. Leave them aside at the beginning.

4. Rename a module: the Properties window

When you insert a module, VBA calls it Module1, then Module2, Module3… These names are too generic 🫤 They don’t describe what is inside your code. Give each module a name that says its purpose, like mdlImport, mdlCopy or mdlSendMail. When you open the project, you know at once where to find each macro 👍😉

To do it, you use the Properties window. It shows the properties of the item selected in the Project Explorer: for a module, its only property is its name.

  1. In the Project Explorer, click on Module1.
  2. If the Properties window is not visible, press F4.
  3. In the line (Name), replace Module1 with a clear name, for example, mdlImport, and press Enter.

⚠️ A module name can’t contain spaces or start with a number. Many developers start it with mdl, so they recognize a module at once.
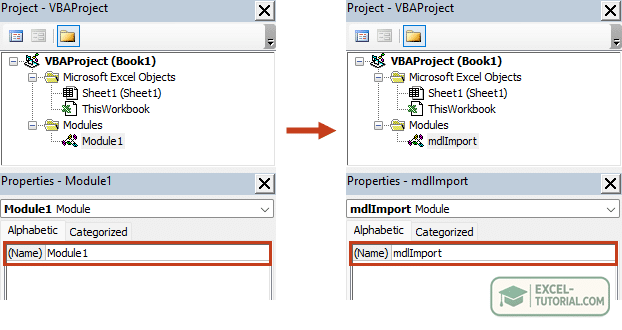
Rename a VBA module in the Properties window: Module1 becomes mdlImport

5. A project with several modules

A small macro fits in one module. But when your project grows, it’s easier to split it into several modules, one per theme. With clear names, you see at once which module does what:

Project Explorer with three renamed modules: mdlImport, mdlReport, mdlTools

To see all the procedures of a module, open it: the list at the top right of the code window shows them, and you can jump from one to another.

6. Run a macro

The following code writes the words My first macro in cell A1 and puts them in bold. Copy it in a module:

Sub FirstMacro()
 Range("A1").Value = "My first macro"
 Range("A1").Font.Bold = True
End Sub

To run it, here is how to do it:

  • From the editor: the cursor must be inside the procedure, between Sub and End Sub. Then press F5.
  • From Excel: press Alt + F8, select the name of the procedure, FirstMacro, then click Run.

Go back to Excel: cell A1 now contains your text, in bold.

7. Save your workbook as .xlsm

⚠️ A normal Excel workbook (.xlsx) can’t contain macros. When you save, choose Excel Macro-Enabled Workbook (*.xlsm), otherwise, your code is lost 😱😱. I’m serious and honest. If you don’t save as xlsm, Excel will NOT keep your VBA code.

SaveAs xlsm

And when you open the file later, click Enable Content to allow the macros (see Microsoft Has Blocked Macros from Running).

What’s next

You now know how to use the VBA Editor: where to write your code, how to organize it in modules with clear names, and how to run it. The next step is to understand the two building blocks of VBA: the procedure and the function.

Practice with exercises

Related articles

Leave a Reply

Your email address will not be published. Required fields are marked *

First Steps with VBA: Discover the VBA Editor

Reading time: 3 minutes

VBA is the programming language inside Excel. With it, you can automate everything you do by hand: sorting, copying, formatting, creating reports.

Whether you write your code yourself or ask an AI to write it for you, there is one prerequisite: you must know the interface of VBA, the Visual Basic Editor. That’s where you paste, run, and correct your code. Here is a simple tour.

1. Open the VBA editor

Press Alt + F11. The VBA editor opens in a new window. Press Alt + F11 again to go back to Excel.

You can also open it from the Developer tab by clicking the Visual Basic button in the first position from the left. If you don’t see this tab, see Enable the Developer Tab in Excel.

The Visual Basic button in the Developer tab of Excel

2. The working environment

The editor has several windows. These are the four you will use the most:

  1. Project Explorer: all the open workbooks, their sheets and their modules (Ctrl + R)
  2. Code window: the white window where you write your code (F7)
  3. Properties window: the properties of the selected item, for example, the name of a module (F4)
  4. Immediate window: a small window to test a line of code or display a result (Ctrl + G)
The VBA editor and its 4 windows: Project Explorer, Code, Properties and Immediate

If a window disappears, you can always reopen it from the View menu or with the shortcuts.

3. Where to write your code

In the Project Explorer, each workbook is a VBA project. To write a macro, you need a module: a page of code. In the menu, choose Insert › Module. A new item Module1 appears in the project, and its code window opens.

You will also see other places where you can write code:

  • Modules (Module1, Module2…): this is where you write your macros. It’s the right place in 9 cases out of 10.
  • The sheets (Sheet1, Sheet2…) and ThisWorkbook: they are used for code that starts automatically, for example when you open the workbook or change a cell. Leave them aside at the beginning.

4. Rename a module: the Properties window

When you insert a module, VBA calls it Module1, then Module2, Module3… These names are too generic 🫤 They don’t describe what is inside your code. Give each module a name that says its purpose, like mdlImport, mdlCopy or mdlSendMail. When you open the project, you know at once where to find each macro 👍😉

To do it, you use the Properties window. It shows the properties of the item selected in the Project Explorer: for a module, its only property is its name.

  1. In the Project Explorer, click on Module1.
  2. If the Properties window is not visible, press F4.
  3. In the line (Name), replace Module1 with a clear name, for example, mdlImport, and press Enter.

⚠️ A module name can’t contain spaces or start with a number. Many developers start it with mdl, so they recognize a module at once.

Rename a VBA module in the Properties window: Module1 becomes mdlImport

5. A project with several modules

A small macro fits in one module. But when your project grows, it’s easier to split it into several modules, one per theme. With clear names, you see at once which module does what:

Project Explorer with three renamed modules: mdlImport, mdlReport, mdlTools

To see all the procedures of a module, open it: the list at the top right of the code window shows them, and you can jump from one to another.

6. Run a macro

The following code writes the words My first macro in cell A1 and puts them in bold. Copy it in a module:

Sub FirstMacro()
 Range("A1").Value = "My first macro"
 Range("A1").Font.Bold = True
End Sub

To run it, here is how to do it:

  • From the editor: the cursor must be inside the procedure, between Sub and End Sub. Then press F5.
  • From Excel: press Alt + F8, select the name of the procedure, FirstMacro, then click Run.

Go back to Excel: cell A1 now contains your text, in bold.

7. Save your workbook as .xlsm

⚠️ A normal Excel workbook (.xlsx) can’t contain macros. When you save, choose Excel Macro-Enabled Workbook (*.xlsm), otherwise, your code is lost 😱😱. I’m serious and honest. If you don’t save as xlsm, Excel will NOT keep your VBA code.

SaveAs xlsm

And when you open the file later, click Enable Content to allow the macros (see Microsoft Has Blocked Macros from Running).

What’s next

You now know how to use the VBA Editor: where to write your code, how to organize it in modules with clear names, and how to run it. The next step is to understand the two building blocks of VBA: the procedure and the function.

Practice with exercises

Related articles

Leave a Reply

Your email address will not be published. Required fields are marked *